Make it Modern Project Tour with Riley Blake – Starbreaker Quilt

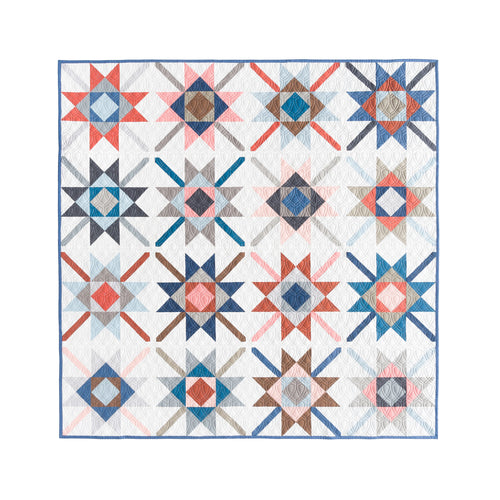
I’m excited to share my Make It Modern project for Riley Blake Designs! I used Riley Blake’s Confetti Cottons solids with my Starbreaker quilt pattern and I am so happy with how it turned out!

This was my first time using Confetti Cottons and I loved sewing with them. The fabric has a soft and silky feeling while still being thick which is a great combination! I used nine colors for the main prints and they had a nice retro vibe to them. The colors I used were Frosting, Marsala, Canyon Rose, Curry, Moss, Lodge Pole, Avocado, CapeVerde, and Oceanside. I was so excited to cut into these fabrics and start sewing the I accidentally left Frosting out of the picture! I used Light Grey for the background and Mediterranean for the backing and binding.

I released the Starbreaker quilt pattern earlier this year and it’s one of my favorite ones to make. The pattern is fat quarter and quarter yard friendly and the blocks are pretty big so it all comes together fairly quickly.

I quilted it using a simple grid with straight lines spaced 1″ apart from each other. I like to go fast when I quilt which lends to a lot of imperfections in those straight lines, but I’ve learned over the years that the denser the quilting is the less you can see those imperfections!

If you haven’t already used Riley Blake’s Confetti Cotton you should definitely give them a try!

Happy Sewing, Laura

Aces High Quilt Pattern

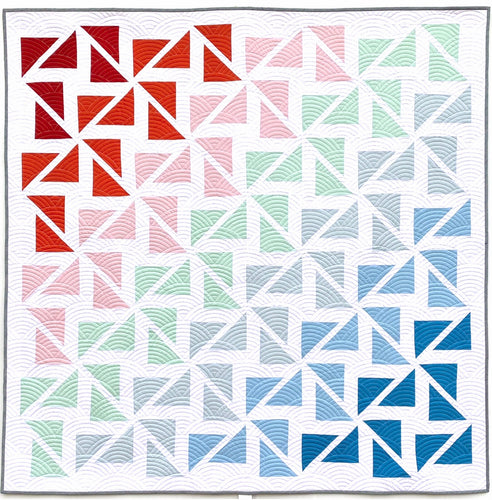
I’m so excited to release my latest pattern – The Aces High Quilt!  You can find the pattern in my Etsy Shop here

Precut Friendly Quilt

The Aces High quilt comes in five different sizes with three different styles – it can be made as a two-toned quilt using yardage, as a multi-colored quilt using fat quarters or quarter yard cuts, or as a scrappy version using two inch strips (perfect for a jelly roll if you don’t mind trimming down the width of the strip).

This pattern utilizes a lot of strip piecing for the most efficient assembly.  Tip:  If you have a Stripology ruler by Creative Grids the cutting and sub-cutting will be lightning fast! 

Two-Toned Quilt

For my two-toned quilt I used Robert Kaufman Kona Cotton Titanium, Harbor, and White.  The quilting was completed by Lindsey Kleinschmidt using the Kaleidoscope pantograph from Karlee Porter.  You can find Lindsey on Instagram @quiltschmidt.

Fat Quarter Friendly Quilt

I used a fat quarter bundle on this beachy themed Aces High quilt.  I love using precuts since they are so fun to buy and you don’t have to worry about matching any colors or prints.  This quilt used the Moda Bella Teal fat quarter bundle, with Kona Cotton Sand and White for the background and Color 2.  The quilting was completed by Sarah Campbell at Stitch Mode Quilts using the Golden Curls pantograph by Urban Elementz.

Pattern Tester Quilts

This quilt pattern wouldn’t be what it is without the help of my amazing pattern testers.  They whipped up this quilt in less than a month and provided great feedback while making gorgeous quilts!!

Ashley @bluelilacquilts made this wintery quilt using a fat quarter bundle of the Snow Day fabric line by Mister Domestic from Art Gallery Fabric. 

Petra @craftyquiltymom made this stunning scrappy version and added her own twist to the pattern by using a pop of yellow in each corner.  I absolutely loved this fun version!

Sue @vinyardquilts made this beautiful version using Kona Cotton Juniper for the background with Kona Snow and Michael Miller’s Burlapped fabric for the accent colors.  I have a green version on my bucket list and can’t wait to get started on it after seeing her quilt.

Maryanna @marvelousauntiem used a Simply Color jelly roll by V and Co. for this scrappy version!  This fabric line is one of my favorites and her black background really makes those colors pop!

Kelsey @lindas_sister went with a holiday themed version and it’s so festive!  I’m also super impressed that she not only made the top in such a quick time frame, she quilted it too!

Erin @eshoberg used Speckled Fabrics from Ruby Star Society and this one really sparkles!  The blues and greens give this one a wintery feel too and is perfect for this time of year!

Debra @debrasander started out making a throw size and decided to turn it into a queen sized quilt.  Blue and white is always a classic combination and this is just beautiful, I can’t wait to see it all finished!

Paper Sun Quilt Pattern

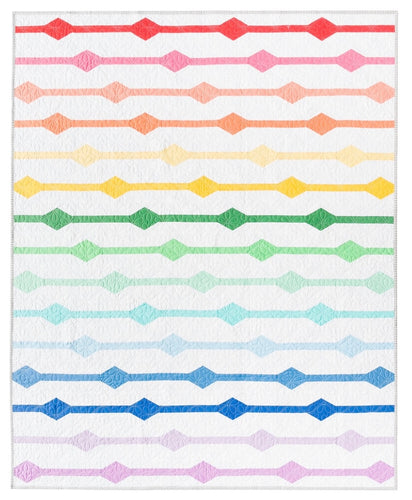
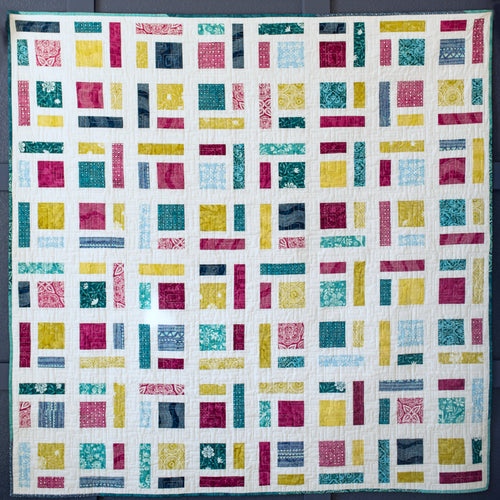
The Paper Sun quilt pattern is now available, you can purchase it in my Etsy shop here!!

The pattern comes in five different sizes and is a fun and versatile design.  The pattern calls for four fabrics plus a background, it looks great in solids or prints!

This version is made from Pure Solids by Art Gallery Fabrics, the colors used were Dried Roses, Blossomed, Spruce, Parisian Blue, and Linen White.  The quilting was completed by Jamie at Quilt Drop, LLC using the Feathered Unfurled quilting design.

I also made a baby quilt using some scraps of Cotton + Steel and Birch Fabrics that I had in my stash, I just love the soft look of this one.

I also had an incredible group of pattern testers on this quilt, all of their quilts are beautiful, and they chose great fabrics.

Sue @SueViny has me dreaming of summer and warmer weather, it looks like she wrapped up the sun in her quilt!

Justine @greatheronhandmade used Ruby Star Society and made this incredible baby quilt, I absolutely love the pink and orange together!!

Michelle @mlsmith325 used green and greys (and accidentally made a Seattle Seahawks quilt) for this stunning version.  She also not only made the quilt top, but quilted and bound it in less than two weeks!!

Courtney @Courtcrafts82 used the Scarlet and Sage collection to make this red and green version for a Christmas present, she also used minky on the back to make it super snuggly!

Nadia @Sleepylittledarlings made a scrappy Christmas version using the Winterberry fabric line, this looks like another snuggly one!

Gwen @Gosewing81 made this adorable baby quilt and used an animal print as the background fabric, I’m sure this one will be loved for a long time!

Sue @susanquiltinator used Rifle Paper fabric and it’s so beautiful, I can’t wait to see this one all quilted up!

Ashley @oeiboymomquilts quilt is stunning with different shades of green, her color placement is spot on!

Jamie @quiltdrop used a dark blue fabric for her background and it’s fabulous.  I’m looking forward to seeing what quilting design she chooses, she always comes up with the perfect one.

Jennifer @jenn_tries_to_quilt made this baby version, those shades of blue and purple are the perfect color combination!

Tracey @ttabes80 made another gorgeous quilt and the pops of orange look so good, I love it!

I am so thankful for all of these amazing pattern tester, they did an amazing job and I couldn’t have done it without them!

Sweet Leaf Quilt – Pattern Release

I’m so excited to release my latest pattern – The Sweet Leaf Quilt!  You can find the pattern in my Finely Fabric Etsy Shop

I used Kona Cotton solids by Robert Kaufman, the colors used are Paprika, Terra Cotta, Baby Pink, Ice Frappe, Blue, Prairie Sky, Malibu, and White.  The quilting was completed by Jamie at Quilt Drop, LLC using the Baptist Fans quilting design.

The Sweet Leaf quilt comes in five different sizes and two different layouts – it can be made scrappy or into a rainbow version using seven different colors. 

I used the Fruity fabric line by Maja Faber for Paintbrush Studios.  The quilting was completed by Jamie at Quilt Drop, LLC using the Dew Drops quilting design by Patricia E. Ritter.

The scrappy version is precut friendly – the baby and throw size can be made with fat quarters and the large throw can be made with a layer cake!  I love using precuts for quilts because you can get a lot of different prints that all coordinate with each other. 

This quilt pattern wouldn’t be what it is without the help of my amazing pattern testers.  Below are the quilts that they made, I love how different each one looks!!

Ashley @oeiboymomquilts made this gorgeous quilt using the Alma line from Ruby Star Society, she even has two more versions in the works!

Nadia @Sleepylittledarlings made this stunning version, blue and whites are always a winner!

Angela @spicyredhead is all ready for the holiday with this cute Christmas version, just look at the polka dot sashing!

Gwen @gosewing81 used a black background with green batiks which makes for an absolutely amazing quilt top!

Anne @batiksbythebay also used black sashing with blue batiks and it looks just like stained glass, I can’t stop staring at it.

Lisa @ljbulas made a beautiful rainbow version using one of my favorite fabric lines, Redux by Giucy Giuce. 

Jamie @quiltdrop is a super quilter.  She has already quilted and bound her quilt top, and she also quilted all three of my quilts. 

Julie @jwestin1959 also made a super festive Christmas quilt, her fabric is so much fun!

Tracey @ttabes80 made the cutest Sweet Leaf quilt, her fabric selection has eyelashes, lipstick, and stripes!

Sue @suehamilton7 is super speedy and has her quilt all quilted and bound, and she did those amazing waves all with her walking foot!

Jen @jenn_tries _to_quilt used a dark sashing and it looks so good, I just love a quilt in the snow picture!

Sue @quiltsue_ was the first one to complete a finished top, and then she made another rainbow one.  I love both of her versions!!

Sue @Susnquiltinator took on the biggest challenge and made a King sized quilt, she used Alma fabric by Ruby Star Society and the dark backing looks so good. 

Denise @dmking52512 created a super fun layout on her version, those oranges really pop!

Petra @craftyquiltymom made an adorable and bright baby quilt!

Lindsey @quiltschmidt used a peachy background color and it looks dreamy!

Lattice Quilt

A few months ago my husband and I went on a fantastic beach vacation to Turks and Caicos.  His good friends were renewing their wedding vows for their 15th wedding anniversary, which made it an extra special vacation.  Since we were going to a beach, I obviously had to bring my beach themed quilt!

I made this quilt as a baby present for an old friend of mine, she and her husband are huge beach lovers so I knew I wanted something to go with that theme!  I had a layer cake of Kona Cotton’s Midnight Oasis collection and the blues, greens, and aqua worked perfectly.

I used Missouri Star Quilt Company’s tutorial for their Lattice Quilt.  The tutorial calls for four charm packs so I just cut my layer cake down into 5 inch squares.  I thought that the construction of the quilt top was very clever and simple.  When I originally saw the pattern I assumed there was a lot of sashing, but there wasn’t any at all which was fantastic.  The tutorial is a great one if you want to check it out.  https://quiltingtutorials.com/tutorial/the-lattice-quilt-quilting-made-easy

My friends are also huge dog lovers and when I saw this doggie newsprint fabric I knew it would be perfect for the backing!  I love text print for backing on a brightly colored quilt, it helps provide some balance and doesn’t’ take away from the quilt top.  I’m a little late giving this one as a gift but I know they will still enjoy the quilt!

Looking Glass Quilt Pattern Release

I’m so excited to release my first quilt pattern – The Looking Glass Quilt!  You can find the pattern in my Finley Fabric Etsy Shop.

The Looking Glass quilt can be made with a layer cake, fat eighth bundle, or fat quarter bundle.  I love using precuts for quilts because you can get a lot of different prints that all coordinate with each other.  When I was designing the quilt I wanted something specifically for fat eighths. Though they can sometimes be difficult to use they are one of my favorite precut sizes. After making my first Looking Glass quilt I then realized that I could easily use 10” squares and have even more of a color variation within the blocks. 

This quilt is also beginner friendly, it is made up of one block using three different prints each.  The blocks are laid out to have a mirrored window effect.  The quilt pattern has several diagrams to help you piece and layout the blocks properly. 

The Looking Glass quilt comes in SIX different sizes!!  The quilt pattern includes the following sizes: crib, lap, throw, large throw, twin and queen. 

I used a fat eighth bundle of Kate Spain’s Longitude Batiks collection for the quilt with the white background.  The background fabric is Kona Cotton in Snow.  The quilting was completed by Emilee Hathaway @emileehathaway.

I used a layer cake of Alison Glass’s Diving Board collection for the quilt with the black background.  The background fabric is Grunge in Iron by BasicGrey for Moda Fabrics.  The quilting was completed by Sew Let’s Quilt It in Dallas, TX.

Polaroid Quilt

My Polariod quilt top is done and it was such a fun finish!! 

I joined the Polaroid Greeting Swap 3 this summer, hosted by Johanna Weidner on Instagram, and received a lot of great blocks.  This was the third time that she’s hosted the Polaroid Greeting Swap but it was my first time participating. 

The swap divided everyone into teams of 12 and you were responsible for making two Polariod blocks for each of your team members, a lot of people were nice enough to send a few extras also.  I received some wonderful fussy cut blocks and was also lucky enough to join several side swaps with people on other teams!  I made a lot of extra blocks to keep for myself and when the swap was done I ended up with about 90 Polaroids total. 

In order to make the fussy cutting a little easier I made myself a template out of stock paper.  I cut a 2.5” square and then cut out the center leaving a quarter-inch frame.  I was able to place this on my fabric before I cut it to make sure that each print was centered.  Once I had the template where I wanted, I laid my ruler on top and cut the 2.5 inch square. 

I knew I wanted to make a quilt with all of my blocks and I loved the shadow effect I’ve seen on other projects.  Johanna has a blog post for how to make the Polaroid blocks and also how to add the shading effect.  http://polaroidgreetingswap.blogspot.com/

I decided that Grunge by Moda would make a good background fabric, I wanted something bright but simple that would also match all the different colors in the blocks.  I ended up choosing the Grunge Basics New Cabana as the color.

After playing with a few possible layouts I decided to make simple square blocks with the Polaroids angled in different directions, I wanted it to resemble a messy photo album.  For each block I cut 2 background strips measuring 2.5” x 3.5” for the sides and 2 strips measuring 2.5” x 7″ for the top and bottom.  I used a little over 4 yards in order to make the border on 110 blocks (I ended making even more blocks after the swap so I could get the quilt to have a layout of 10 x 11). 

Once I had the borders sewn on I divided the blocks into 3 even stacks.  I then cut down all of the finished blocks to 6.5” squares with one stack angled to the left, one angled to the right, and one stack centered.  I didn’t measure the “centered” blocks perfectly, some still had a slight angle one way or the other and some had thicker borders on one side, I didn’t want it be too symmetrical. 

When I had all of the blocks cut down to 6.5” squares I started sewing blocks together randomly, I only had a few duplicate or similar prints so it was pretty easy to sew without planning!  I ended up with 10 blocks per row, and 11 rows total. 

I found the perfect fabric for the backing – black and white vintage cameras!!  I love this backing so much since it fits the theme but helps neutralize all of the different colors on the front.


I can’t wait for the quilting to be completed, this has probably been the most fun quilt I’ve made yet!!  I really hope there is another swap next year, I’d love to participate again!

Baby Quilts…Part 2

I made a lot of baby quilts in 2017 – five to be exact.  Five may not sound like a lot to some of you, but five quilts total in one year is a lot for me!

The first quilt was completed in January so technically I started it the previous year.  My husband’s cousin (is cousin-in-law a thing?) was having her first baby, a boy, and wanted a southwest theme for his quilt. She is an art teacher and picked a beautiful color pallet of golds, mints, blues, and greys. I knew that she had some specific ideas about how she wanted to decorate the nursery, so I wanted her to also be involved in choosing the pattern and fabrics.  We ended up choosing the Over the Rainbow pattern by Keera Job for Live Love Sew and I used Hawthorne Threads for the fabric. Since they print their own material it is easy to get the exact color and print combinations that you want.  The quilting was done with an argyle pattern which helped incorporate the angles that we wanted, I also used a striped binding which is quickly becoming my go-to for binding.  I really love the way this quilt turned out and it works perfectly with the little guy’s room.

The next four baby quilts were all for my group of friends.  The babies were due within a few months of each other so I knew I needed some quick patterns.  I choose the Summer in the Park pattern by Missouri Star Quilt Company for the first quilt.  It was for a baby boy so I picked a Kaffe Fassett jelly roll with blues and greens and paired that with a solid white jelly roll.  This pattern was a lot of fun to make, although some of the points were hard to match up since the cut is on the bias.  I had this one quilted with little cars and curvy lines.

The second baby quilt was for a good friend of mine that was having a baby girl.   She and her husband are huge animal lovers so I wanted to do something with an animal theme.  This turned out to be surprisingly difficult as I had trouble finding anything that really inspired me.  I had a jelly roll of Hello Love by Heather Bailey that would be perfect for a baby girl and one of the prints in the line had octopuses on it.  I had also wanted to make the Modern Trellis pattern by Must Love Quilts for a while and was able to use the jelly roll for it.  This one had flowers, dragonflies, and ladybugs quilted on it, the cream background really shows the quilting pattern well. Though creatively challenging, I’m happy with the results.

Next in line was a friend from work. She was planning a zoo theme with bright colors for her nursery and as soon as I saw these Robert Kaufman Urban Zoologie fabric panels I knew I had to use them.  The panels originally had some lighter colors, including a baby pink as the natural border, and I knew that I wanted to brighten those colors up.  I chose some coordinating blues, greens, yellows, and oranges and added a new border to the panels, I also made some simple square blocks for filler.  This one came together very quickly and was quilted with adorable zoo animals.

The last quilt of the year is one of my favorite baby patterns to make, it is the Sunshine and Shadow pattern from the Tradition with a Twist book. I’ve made it twice in the past but unfortunately didn’t take pictures of them. I used Hawthorne Threads again to pick six fabrics from three different colors – I used blue, mint, and grey.  I had it quilted with a curly star design and used the stripe binding once again.  One day I need to make this pattern in a large quilt for myself!

I’ve seen most of these quilts many times since making them. It always makes me happy to see them getting worn and used for their intended purpose.

And that’s it for baby quilts, at least for the foreseeable future!

Follow on Bloglovin

Baby Quilts…Part One!

Hey Everyone!  It’s been awhile since my last post. My husband and I have taken a few small trips this spring and we all know the backlog that creates when returning back to real life. But for the first time in years I don’t have to count a baby quilt as one of those pending items!

Over the last ten years I can’t remember a time when there wasn’t at least one baby quilt in progress, often times more. Unfortunately, I don’t have pictures of some of the earlier ones but I’m getting better at documenting my quilts.

The first of many baby quilts that I made was in 2009 for my sister-in-law’s first child.  This is one of the few baby quilts that was actually a “baby” size.  I used the Hanky Panky pattern by Darlene Zimmerman and Rachel Shelburne and my mother-in-law picked out the fabric.  Both my SIL and her husband met at Texas A&M so the corner stones of this quilt has the Aggie logo. 

For her second son she helped design the pattern and also asked for a larger quilt that he could continue to use as he got older.  This was the start of making lap-size and larger baby quilts and I’ve made the larger quilts for almost everyone since. This was the first quilt that I ever appliqued and I naively chose the argyle print for the lettering.  I love the pattern and fabric but the appliqued block was definitely a learning process for me.


In 2013 I made a quilt for my best friend using the Lucky Square pattern by Sew Crafty Jess.  She and her husband are big travelers and were engaged at Versailles, I used a map of Paris on the back and color patterns to match the baby room on the front.  It’s a fun and colorful quilt.

The quilt for my sister-in-law’s third son was really enjoyable to make. The pattern was quick and easy and I used a lot of bright colors, some were from my stash and others were random fat quarters that I picked up at my local quilt shop.  The quilt pattern is Off Track by Cluck Cluck Sew and measures at 58” x 63”.  I also used a fun backing material on this one, it is a Viking’s travel map from Timeless Treasure. 

In 2016 I finally had the opportunity to make a baby girl quilt and had a lot of fun picking out the fabric.  My SIL found this adorable deer fabric from Hawthorne Threads and chose the Hopscotch pattern from Thimble Blossoms.  This quilt turned out to be one of my favorite quilts I’ve made; the pattern is stunning and the fabric line is gorgeous.  This was also the second quilt that I’ve ever taken to a long-arm quilter and have never looked back.  The basting and quilting process has always been a chore for me and I love that I can just drop a quilt off and have beautiful patterns quilted.  For this quilt I chose a quilt pattern that had ladybugs, dragonflies, and flowers. 

2017 was a really busy year with four baby quilts made, I’ll save those for Part Two!!

Pillow Tutorial with Envelope Backing

I love making quilted pillows to give as a present or to add some seasonal decorations to the house– they are easy to make, relatively quick for a handmade item, and always appreciated by the recipient. After making numerous pillows this holiday season I wanted to share my way of making an envelope backing. I’ve always struggled with zippers and I have found this method to be quick and hassle free.

First you need to determine the size of the pillow and make your pillow top. I like my pillows to be firmly stuffed so I make the pillow the same size as the pillow form, if I buy a 16” square pillow form then both my front and back will measure 16” exactly. If you like your pillow to be a little looser then you can make your front and back a half inch larger than the form.

I typically start with a quilted pillow front. I used a simple patchwork pattern then layered it with a piece of cotton batting and muslin for the back. I quilted it with straight lines then cut the final product down to a 16” square.

Next you will need to cut two rectangles from a coordinating fabric that you want to use for the backing. The width of the rectangles will match the pillow width, in this case it is 16”. You will need to do some math to figure out the height – I take the width of the fabric divided by two, then add 3.5 inches. For a 16 inch pillow you will want 11.5 inches as the height (16/2=8, 8+3.5= 11.5). Below is a chart for some of the most common sizes.

Pillow Size Backing Pieces (cut 2 pieces per pillow)
12” square 9.5” x 12”
14” square 10.5” x 14”
16” square 11.5” x 16”
18” square 12.5” x 18”
20” square 13.5” x 20”

Once you have the rectangles cut you will need to take a long side of the piece and fold it over approximately ¼” (this doesn’t have to be an exact measurement, you can eyeball it).  I spray the fold lightly with Magic Sizing and iron it. You will need to fold it over one more time so the cut side of the fabric is hidden.


Using a matching thread you will need to topstitch the fold down close to the fold side. You will do this on one long side of each rectangle.

NOTE: If you have directional fabric you will need to make the fold on the top side of one rectangle and the bottom side of the other.

Now it is time to sew the pillow together. I like to have a binding on my pillows, I think it really adds to the pillow and helps it stand out. If you are adding a binding then follow the directions below with the right side of the pillows both facing out (wrong side together). If you are not adding a binding then you need to sew the pillow right sides together and then turn the pillow the right side out.

Place the pillow top right side down on your work table.

Place one backing rectangle on the bottom of the pillow, right side up, with the sewn seam edge in the middle of the pillow. Next add the other rectangle piece, right side up, with the sewn seam edge in the middle.

Pin the pieces together along the edge.

Sew a ¼” seam around all four edges of the pillow. Your pillow is almost done now, you just need to add the binding!

You can finish the pillow any binding method of your choice. I use 2 ½” inch strips for my binding, machine sew to the front of the pillow, and hand stitch it to the back side. If your pillow is 18” square or smaller you will need two strips cut the width of the fabric, any pillow larger than that will likely need 3 strips.

Follow on Bloglovin